This is my first post in this blog!!! Hope everyone likes it..
In spite of having interest on crafts, I never took a chance to create something like this..
I broke that by making a greeting card for the first time..
- Card stock - For greeting card - A4 size
- Colour papers - To make a birthday cake and embellishments - A4 size
- Sketch Pencils and Pens - To draw and write
- Scissors and Glues - To Cut and Paste
- Ribbon and Toothpick - To tie and quill
- Circle compass cutter - Optional ( Don't have one - No worries, I will show you how to)
Here is my plan -
- I want to make a birthday cake with paper to paste it on the greeting card and make it simple inside with just some balloons and message.
Birthday Cake - Do you like just one level or 3 levels of cake??? I go for 3 levels.. :)
- For 3 levels cake, you need 2 semi circles of 7cm diameter, 1 semicircle of 5.5cm diameter, 1 semicircle of 4 cm diameter..Worrying about the measurements...Don't worry I am here to help you... :)
 |
Click here to draw circles with required measurements and screenshot(Press fn+Prnt Scrn in your keyboard) them. Print the screen shot page and cut the circles. Hurray!!! got the circles.. :)
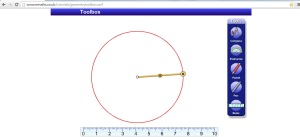
Caution : Please print it with 'No Scaling' option else printer will try to print the screen shot to fit the page.
- Now, we are going to start the layers of the cake. I chosen pink colour paper for my cake. For layering take the same colour A4 size paper and cut a strip of paper by measuring 5-6 cm width. Sorry, No snaps but I know you are smart and you can do this by looking in to the below pictures.
- Measure 1 cm to left and right of the strip and cut it like fringes as below. Make sure that you do only 1 cm to left and right leaving 2-3 cm in the middle which makes the height of the cake level.
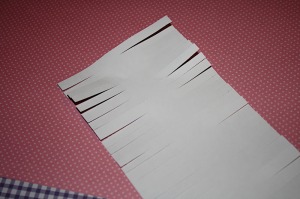
- Picture from google for illustration
- Start gluing the cut paper to the big semicircle that we have on the rounded edges.

Caution : Leave one inch on both sides while you are gluing which is very important.
- Gluing the other semi-circle on top will look like 3d semi-circle as shown below

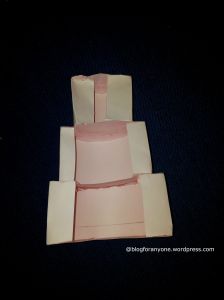
- Repeat the same with the other two semicircles but the only difference is they will not have bottom because the first level will act as bottom for the second and the second for third. Once you complete, your cake will be the same as below.
- Backside of the cake..observe one inch paper on left and right


- Front view of the cake..

- Don't forget to leave one inch on both sides while gluing as it is very important if you need to glue this cake on card. Cake is ready just left out with decorations... :D
Greeting Card - Do you like a normal greeting card or something special? I go with something special..:)
- To make the base of the greeting card, I used a red colour light card stock but not too heavy one as it becomes heavier after adding birthday cake. If not, you can use cardboard you have in house and cover it with a paper.
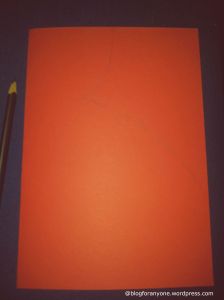
- Now comes something special, I just want the card to have a feminine look. So I cut the front cover as below. As I am not in to these kind of things before, I have drawn an outline with a pencil before I cut. You can directly cut if you are enough confident.
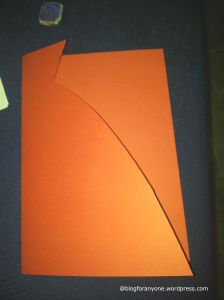
- After Cut
Doesn't it look like a fairy girl with a big gown... :)..If not may be I need to show you the waist line.. - As I have too many specials outside, I want it to be very simple outside. I took a lavender paper with the length and width smaller than the greeting card so that it can fit inside. I have drawn some balloons and Happy Birthday Message on the paper and glued it inside the card.


- Now it's time to glue the cake and decorate it..Ooh..I don't have any embellishments to decorate.. :( ..No Problem, I quilled some paper to form basic shapes and glued it on the bottom two layers. To make it more special, I quilled some paper roses and glued it on the first layer.. Finally it looks like this... :)

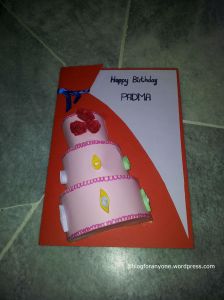
- Wow....

Now can you see the waist line..Just slit the card along the crease where you have the cut in the card and bow a ribbon through that..That's it..A card with feminine look.. :D
I hope you also liked this card and please let me know your feedback on comments section as those are so much to me...
Enjoy your handmade cards and crafts..See you soon... :)
P.S: Sorry for the bad lighting..I took those photos with my mobile and don't think that I copied those photos by seeing the signature on the photos..It's my other blog..
Linking this to
Just Keep on Creating - Anything goes challenge
Bye for now... :)
Lovely card ..the dimensional cake is so clever !
ReplyDeleteThank you so much.. :)
DeleteThis comment has been removed by the author.
ReplyDeleteThis card is very very cool, always fun trying something new, all the effort you put into the dimensional cake was certainly worth it.
ReplyDeleteThanks so much for sharing your card at Anything goes, Just keep on creating :)